Ever since the macadmin community realized imaging was dead back in 2017, there has been an ongoing search for the most effective scripted installation methods. Using an MDM solution and DEP enrollment in combination, it is possible to achieve a setup similar to and even better than what was possible with imaging.
One possible drawback of such a solution is that all software needs to be installed over an internet connection or over the network from a local cache. This can result in users having to wait for everything from half an hour to several hours before everything is in place, depending on network speed and how many and heavy the packages are.
Apple did, however, provide a way to preinstall packages as part of the OS install: using the startosinstall tool with the –installpackage option, a process covered in the latter part of Armin Briegel’s book macOS installation.
Used in combination with an MDM solution, the option can speed up the time from when a user is handed a new machine until they can start working, even if it causes somewhat longer installation times for IT. Most packages will work well when installed in this manner, a few will not.
Using the command manually in a production environment, is not realistic. There are currently two ways of automating the process: installr and MacDeployStick. The latter has to be one of the most creative pieces of software ever launched on the Mac, and I sincerely hope Apple will make sure it keeps working with future OS updates.
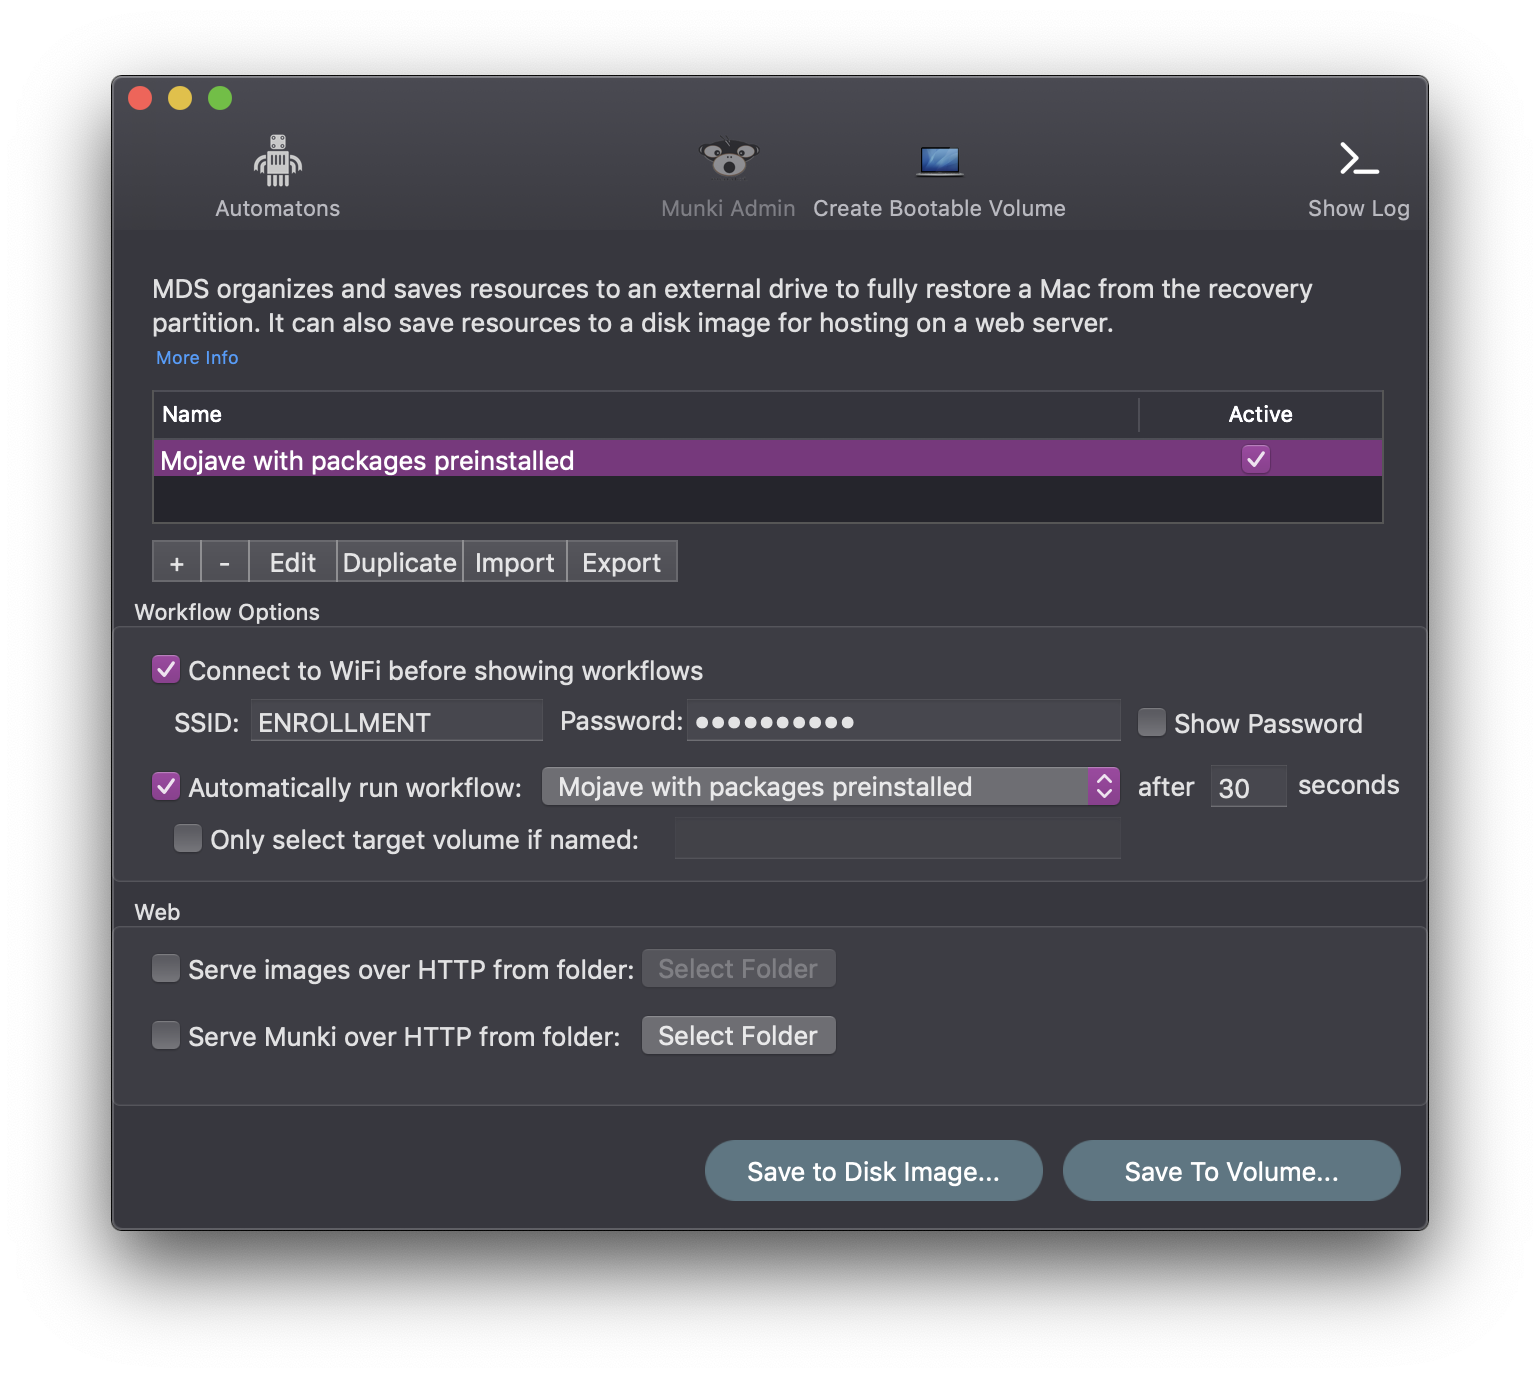
Using MacDeployStick in combination with Jamf:
– Packages that work well when installed as part of an OS install, for example Microsoft Office, can simply be placed in the dock using a utility like dockutil after MDM enrollment.
– Packages, installers, wallpapers and other files that need to be installed after user creation and login, can be pre-deployed to a folder used by IT, for example /usr/local/packages by building one or several packages containing these files with Packages. Their usage and final placement can be scripted post-enrollment using Jamf policies and shell scripts.
The time before new users can get productive when handed a new machine can be dramatically reduced using this process. It works well both with DEP and UAMDM enrollment, in combination with Jamf.
Short how-to: In the MacDeployStick app, click the + sign to create a new workflow. Under macOS, add the most recent macOS installer, downloaded from the App Store, tick Erase and Install. Under Resources add the folder containing packages you want to pre-deploy. Tick OK.
You should connect to a network prior to OS installation, as this is required in case the installer needs to fetch firmware updates for your hardware or verify the OS image. You could use Ethernet or a Wi-Fi network specifically for the purpose. Depending on whether you have machines that require an earlier OS version or different large packages, or not, you could have several workflows instead of running a default workflow automatically.
The Automaton
Using MacDeployStick does potentially require a bit more effort from IT than the default OS installer. It relies on being able to start Terminal from Recovery and running the command /Volumes/mds/run, which isn’t particularly difficult, but still best avoided in many organizations. Luckily the process can be automated by using ItsyBitsy chips from Adafruit programmed by MacDeployStick to enter the necessary key combinations – an effective method in a large organization. The Automaton can also enter firmware passwords, if you are using them.
Adafruit’s ItsyBitsy chips linked to above are based on the Arduino Leonardo (open-source hardware) and can programmatically control mouse and keyboard movements. Bear in mind that it relies on a U.S. keymap. If you are having issues with slashes not appearing right, try entering the key that corresponds to the placement of the slash on your local keyboard on a U.S. mac keyboard instead. If the OS installer does not appear in your language, add this package to the Packages folder in MDS, and restart the machine after installation to bring up the language chooser.
The machines need to have a proper recovery partition in place for MacDeployStick to work. If they do not, you have to format and reinstall them first. Also, some key combinations and setups will cause a machine to enter Internet Recovery instead of using the local recovery partition. If this is the case, try holding ⌘-R at bootup instead of your usual key combination.
On newer machines with the T2 security chip, opening Terminal from Recovery with FileVault encryption enabled could pose a problem. MacDeployStick 1.8 has solved this, however.
Worth noting:
- bootstrappr, another sideloading solution, works with less packages, as it uses the installer command in a pre-boot environment not all packages are expecting, causing problems related to paths and available helper tools used by postinstall scripts in incompatible packages.
- You should consider what Startup Security settings are right for your organization in the long run, especially as they relate to compatibility with upcoming macOS Catalina and deployment methods like MacDeployStick. For the time being, MacDeployStick is reported to work with default settings and it is not obvious that reducing security will make future re-installs easier or if the opposite might be true.
- If Terminal won’t open in recovery on a T2 machine, delete the OS partition (not the whole drive) before starting Terminal.
