Most of us have Wi-Fi-connected devices at home: speakers, printers, robot vacuum cleaners and more. Even though some of these will receive firmware and security updates, they often will not.
An example: Your speakers, even though they might be from a good audio brand and as good as they were five years ago, might not have gotten an update in years and could be vulnerable to recent WPA2 vulnerabilities such as the KRACK attack.
A good practice, which will likely become more and more common (and perhaps easier for consumers) is isolating your IoT stuff on a separate network. The idea is to allow your computers (on a more secure network) to initiate conversations with devices, but not vice-versa, and also be selective about which devices are allowed contact with the internet. If you work at home, you could also have a separate network for the office computer, which is only allowed Internet access.
This can be achieved with a firewall and a Wi-Fi Access Point capable of VLAN tagging. For most home users, a powerful and cheap solution on par with far more expensive commercial solutions is the pfSense open source firewall coupled with a UniFi nanoHD Access Point. pfSense runs FreeBSD, is blazingly fast and allows installation using the ZFS file system (encrypted if you like). You could either buy a generic box from a company such as Protectli or get it directly from Netgate.
Others have covered the process as far as to prevent your devices from contacting your network and VLAN tagging, but not how to selectively prevent your devices from accessing the internet.
Here is a summary of the steps needed for this:
- Put your ISP router in Bridge Mode, connect one of the LAN ports on the router to the WAN port in your pfSense firewall.
- Connect your Wi-Fi Access Point to an OPT or LAN port in the pfSense firewall. If you are using UniFi APs, bridge LAN and Wi-Fi first, so you can be on the same subnet as the AP during first time setup (this can be changed back later).
- Configure the Wi-Fi Access Point with two or three networks, for example one 2.4 Ghz network for IoT devices, a secure Home Office network and a Private network.
- On the Wi-Fi Access Point, add VLAN tags (for example 20, 30, 40) to the different SSIDs. On UniFi APs this option is easily available in the GUI, whereas manufacturers such as Synology do not even give you the option (Synology does already support the new WPA3 standard, however, and they have several nice options for home users, such as support for Time Machine).
- In pfSense, add corresponding VLANs under Interfaces-Assignments-VLANs, all on the same parent interface as the Wi-Fi AP, using the same tagging numbers and appropriate names such as Home, Office and Devices.
- Now, under Interfaces-Assignments add the three VLANs. Name them appropriately, for example VLAN20, VLAN30 and VLA N40. Use Static IPv4 as Configuration Type, and, for example, 192.168.20.1, 192.168.30.1 and 192.168.40.1 as IP addresses. Then enable the DHCP server on each VLAN interface under Services-DHCP and put an IP range in each, for example 192.168.20.10-192.168.20.200 (leaving some room for static mappings). Disable any DHCP servers in the UniFi equipment.
Now for the appropriate pfSense firewall rules…
(Let us assume VLAN20 is Home, VLAN30 is Office and VLAN40 is for Devices and IPv6 is disabled)
On the Home network:
Action: Pass
Interface: VLAN20
Address Family: IPv4
Protocol: Any
Source: VLAN20 net
Destination: Any
Description: Default allow VLAN20 to any rule
On the Office network:
First, create an alias describing all local non-Office networks under Firewall-Aliases. For example the alias nonOffice for the following address ranges: 192.168.1.0/24, 192.168.20.0/24, 192.168.40.0/24 (Type: Networks). Then add these rules:
Action: Block
Interface: VLAN30
Address Family: IPv4
Protocol: Any
Source: Single host or alias nonOffice
Destination: Any
Description: Block LAN-Office
Action: Pass
Interface: VLAN30
Address Family: IPv4
Protocol: Any
Source: Any
Destination: (Tick Invert match) Single host or alias nonOffice
Description: Block Office-LAN
On the IoT Device network:
First, create an alias for all devices that need internet connectivity, such as the Google Chromecast (Type Hosts). This time indicate the specific IP address of these devices when creating the alias. To be able to do this, give each of them a static IP address first, by ticking the left plus sign under Status-DHCP Leases. Let us assume you have added the devices that need internet access to the alias internetDevices.
Then create an alias for the rest of the local network, except the IoT VLAN. For example: 192.168.1.0/24, 192.168.20.0/24, 192.168.30.0/24 (Type: Networks). Let us assume this alias is named computerLAN.
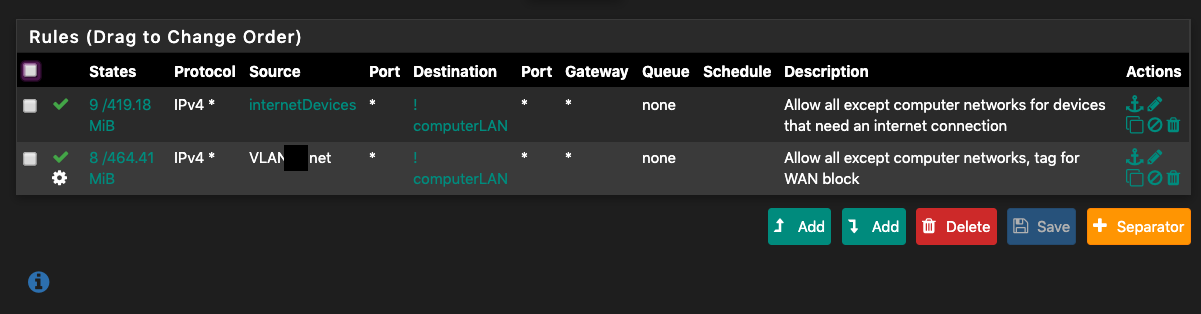
Then add these rules (in the same order as displayed here, rules can ble drag-and-dropped in pfSense to change the order):
Action: Pass
Interface: VLAN40
Address Family: IPv4
Protocol: Any
Source: Single host or alias internetDevices
Destination: (Tick Invert match) Single host or alias computerLAN
Description: Allow all except computer networks for devices that need an internet connection
Action: Pass
Interface: VLAN40
Address Family: IPv4
Protocol: Any
Source: VLAN20 net
Destination: (Tick Invert match) Single host or alias computerLAN
Description: Allow all except computer networks, tag for WAN block
Advanced Options: (Click Display Advanced)
Tag: IOT
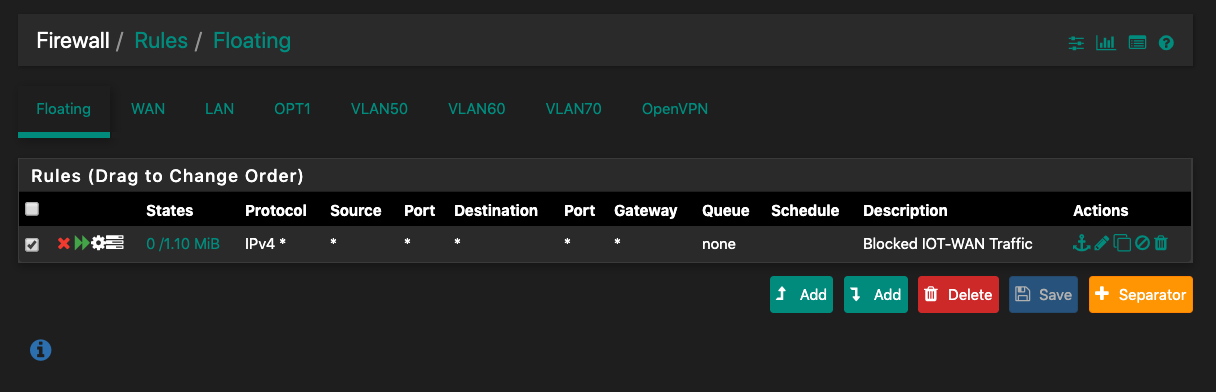
Then, under Firewall-Rules-Floating, add this rule, to block traffic tagged as coming from the IOT network from WAN:
Action: Block
Quick: (Tick Apply the action immediately on match)
Interface: WAN
Direction any
Address Family: IPv4
Protocol: Any
Source: any
Destination: any
Log: (Log packets that are handled by this rule) [Tick this if you wish to see what your IOT devices are doing]
Advanced Options: (Click Display Advanced)
Tagged: IOT
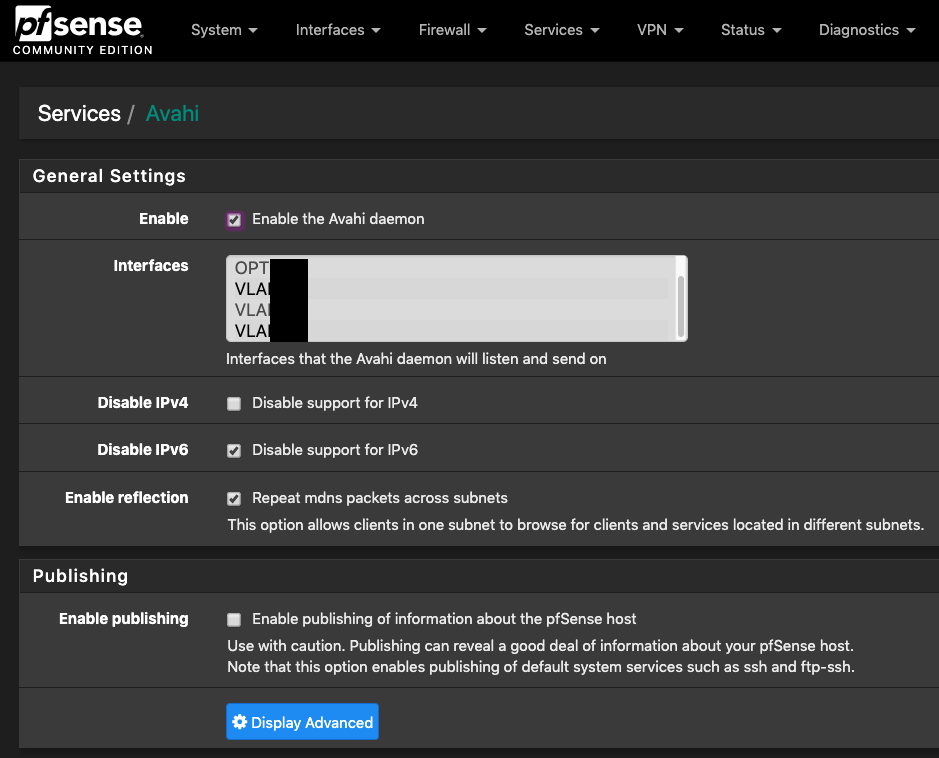
Lastly, go to System-Package Manager and install Avahi. Go to Services-Avahi and enable the Avahi daemon. Select the Home and Devices VLANs, Tick Disable IPv6 and Repeat mdns packets across subnets, then untick enable publishing. This will enable Bonjour multicast between the Home and Devices Wi-Fi networks, so your computers and phones can easily see and use your devices.
So there you have it, a professional quality firewall and secure VLAN setup with IOT isolation for around 360 dollars, if you go with the Netgate SG-1100 and UniFi nanoHD AP.
You could also look at what IPs your IoT devices are trying to contact, and make rules for each of them so that they are only allowed to contact these.
Ensure the security of your pfSense installation by disabling or restricting services you will not need as wide access to after the initial configuration and adaption phase, such as ssh.
Intrusion detection from Cisco
For extra security, I recommend adding the Cisco-developed and free Snort Intrusion Detection/Prevention System, for example in Connectivity and Balanced mode on the Home and Office LAN, so you can see any unusual activity getting past the firewall. Be careful about going all-in with IDS/IPS systems and making them block offenders, as they can slow down your network or make your firewall run out of memory and crash if you add too many lists and tick the wrong options.
Suricata is a nice alternative to Snort on pfSense, but I have found it to be less compatible with the rest of my setup. Suricata’s more modern way of inspecting the packages before the interface is incompatible with VLAN tagging, apparently, and it does not treat the Snort ruleset in the same manner as Snort. I am instead looking forward to the next version of Snort, which will include multithreading support (already offered in Suricata).
If you will frequently need VPN access to your home network and would like to use more services, such as Snort, for a more powerful firewall than the SG-1100 at a reasonable price, try one of the Protectli boxes and install pfSense on it. This will also let you encrypt the data-at-rest. I recommend getting a box with a processor that has AES-NI support and a good quality SSD. Turn on the pfSense option to save logs to a RAM disk if you are not sure what your SSD can sustain.
Other installation tips
I tested pfblockerNG (for blocking advertisements and tracking using DNS) and a few other packages. Some are very stable, but others might not be. I managed to mess up my installation due to incompatibilities between a specific pfSense version and some of the packages, and had to reinstall a few times. Do not add any packages in a production environment without thorough testing and backing up first, and keep copies of configuration files.
If you want to block advertisements and tracking on the network level, consider running DNS on a different server. A Raspberry Pi running Raspbian Light and Pi-hole will do the job perfectly.
Forwarding all queries to a local DNS server will usually slow things down, depending on your hardware. Many use free DNS services from Cloudflare, Google or Quad9, but in fact these can be less private and sometimes slower than your ISPs server. They have to traverse more networks, and depending on how they are set up, the degree of encryption differs. Unless you really experience more responsive lookups or need the blacklist offered by Quad9 I would stick with the ISP default offering.
I also tried Squid proxy; unless you have kids and want to block unsuitable websites it might not be worth it on a home installation. Especially with the increasing use of HTTPS and newer versions of TLS on the horizon, complicating caching and packet inspection.

Wow this is the best simple setup expanation I have seen. Thanks
LikeLike